Performance Guidelines
The following document will outline the requirements necessary to record the best footage to produce a digital avatar. The avatar shoot does not take much time, but it’s advised that you follow these guidelines for the best possible outcome. Please follow the requirements carefully, as the quality of the footage and your performance on camera determines the quality of the avatar.
Video Background
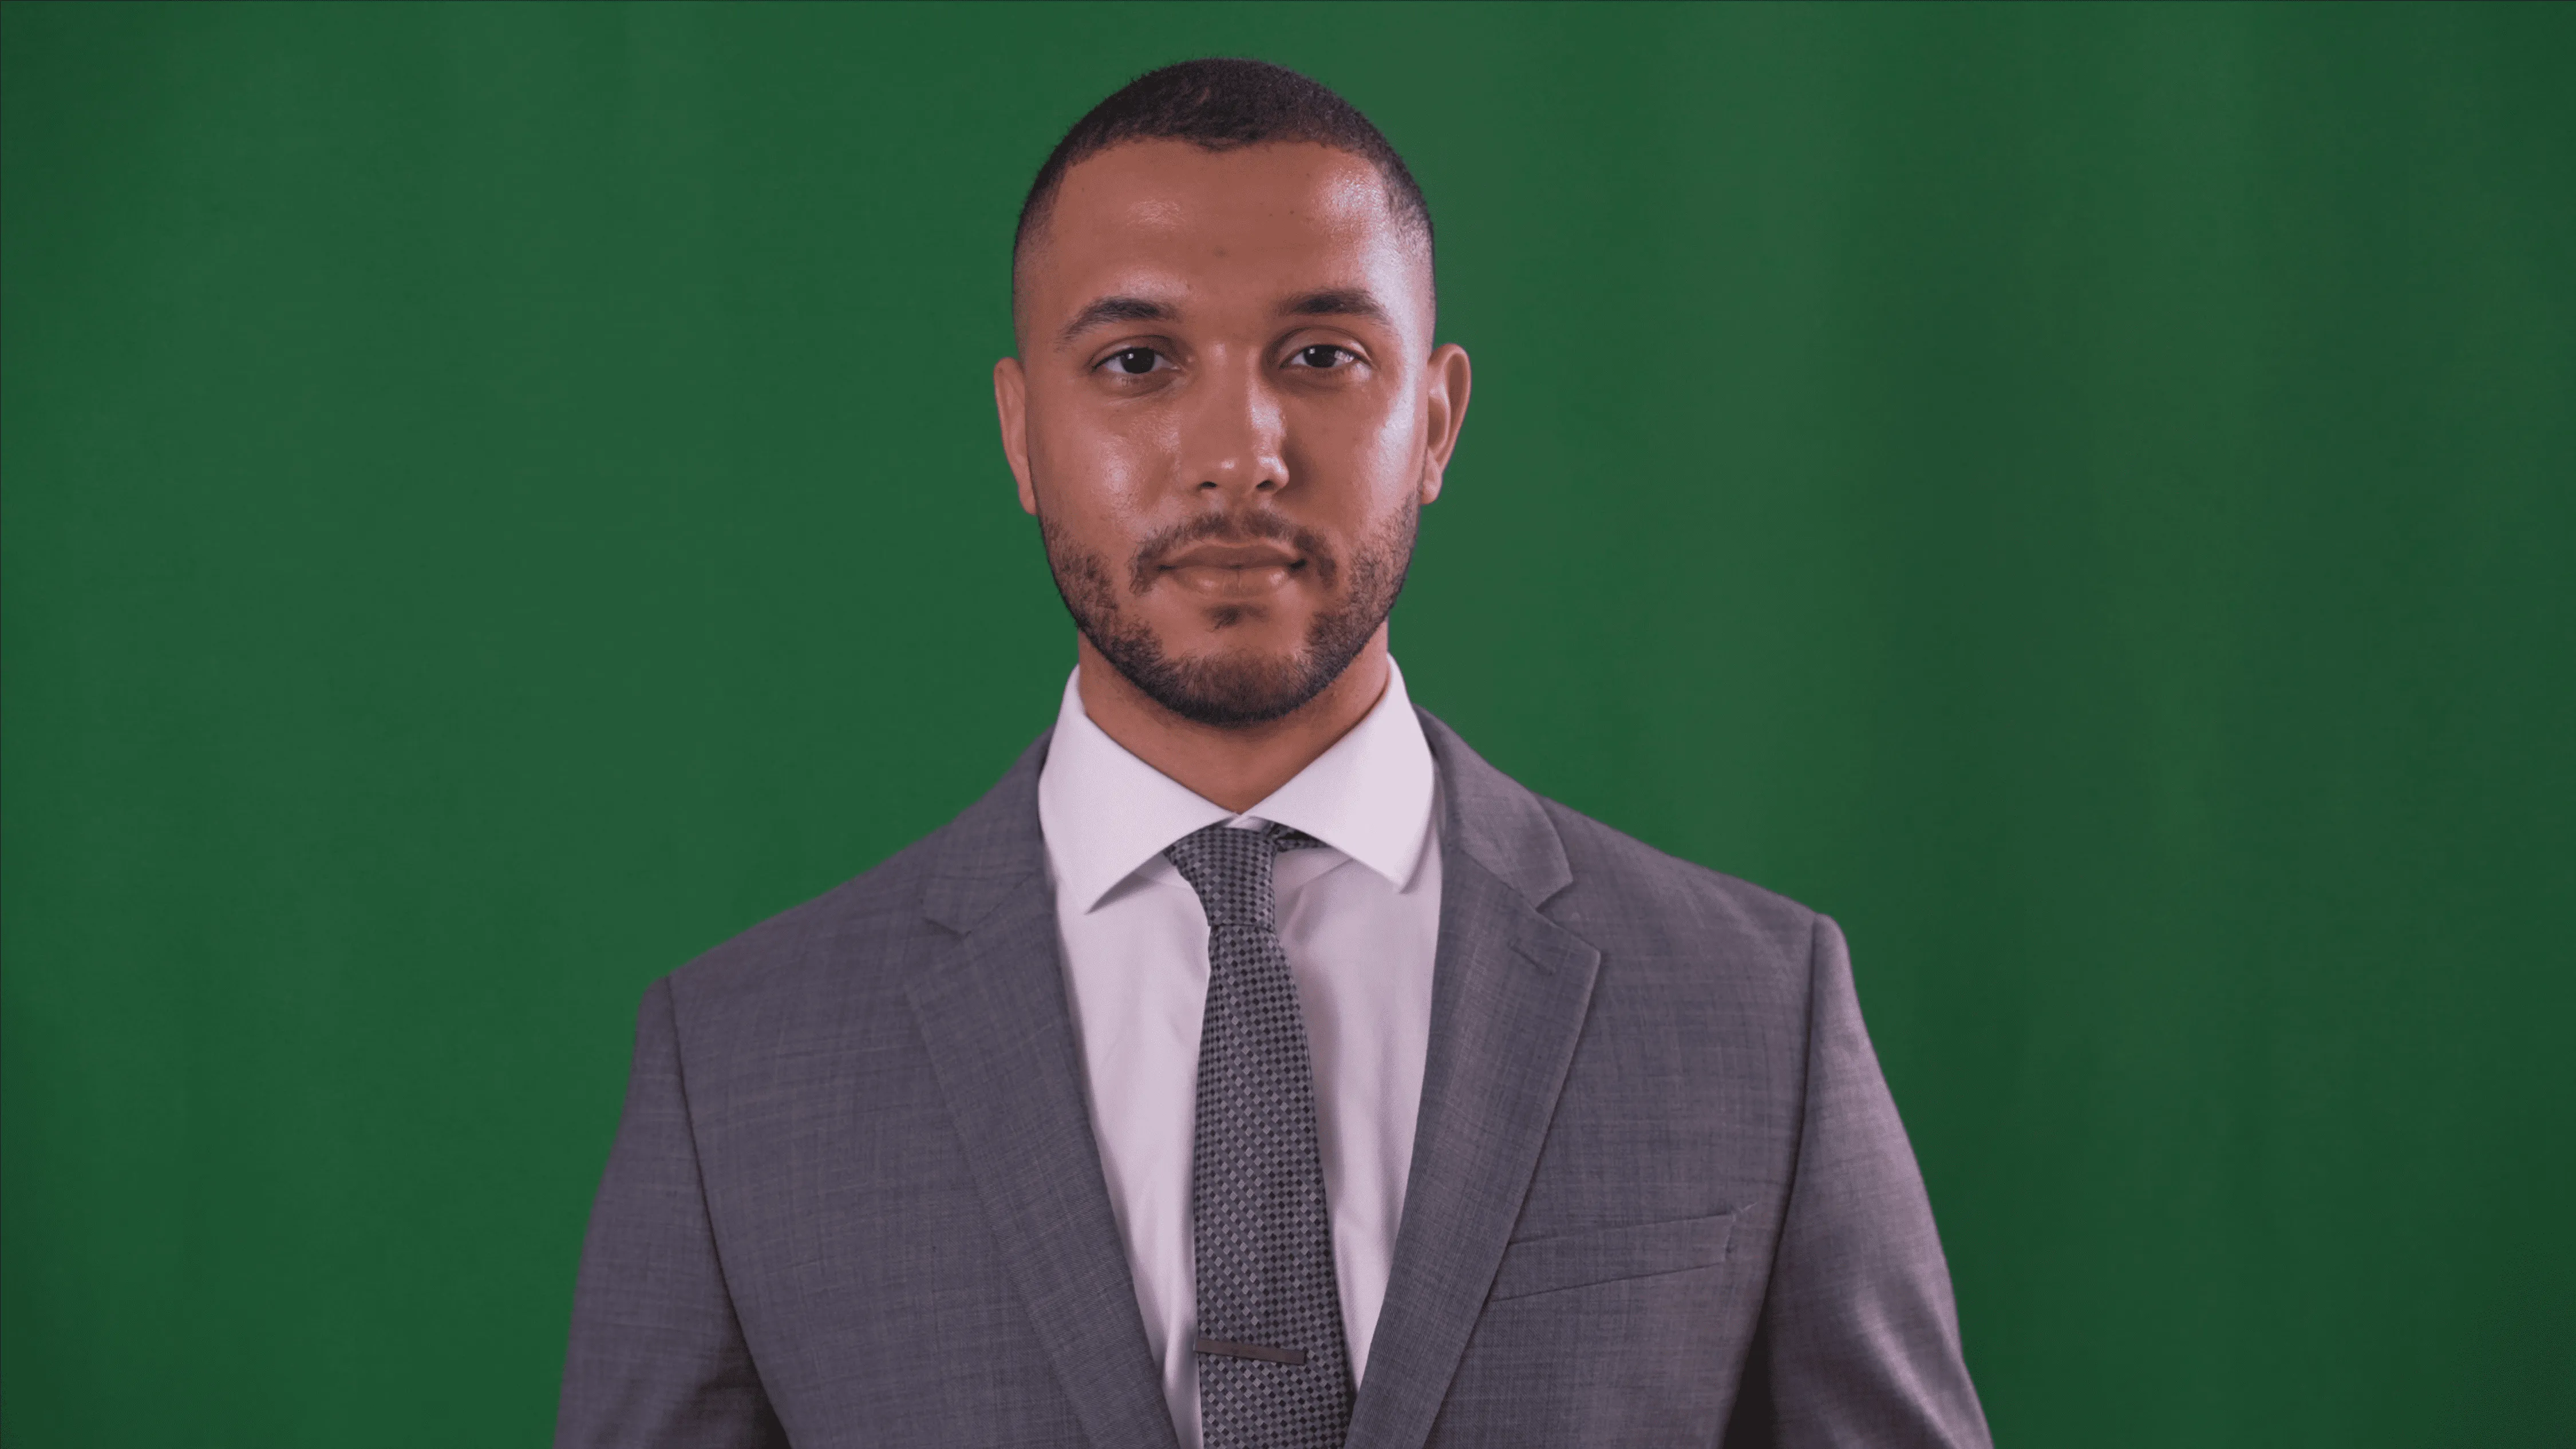
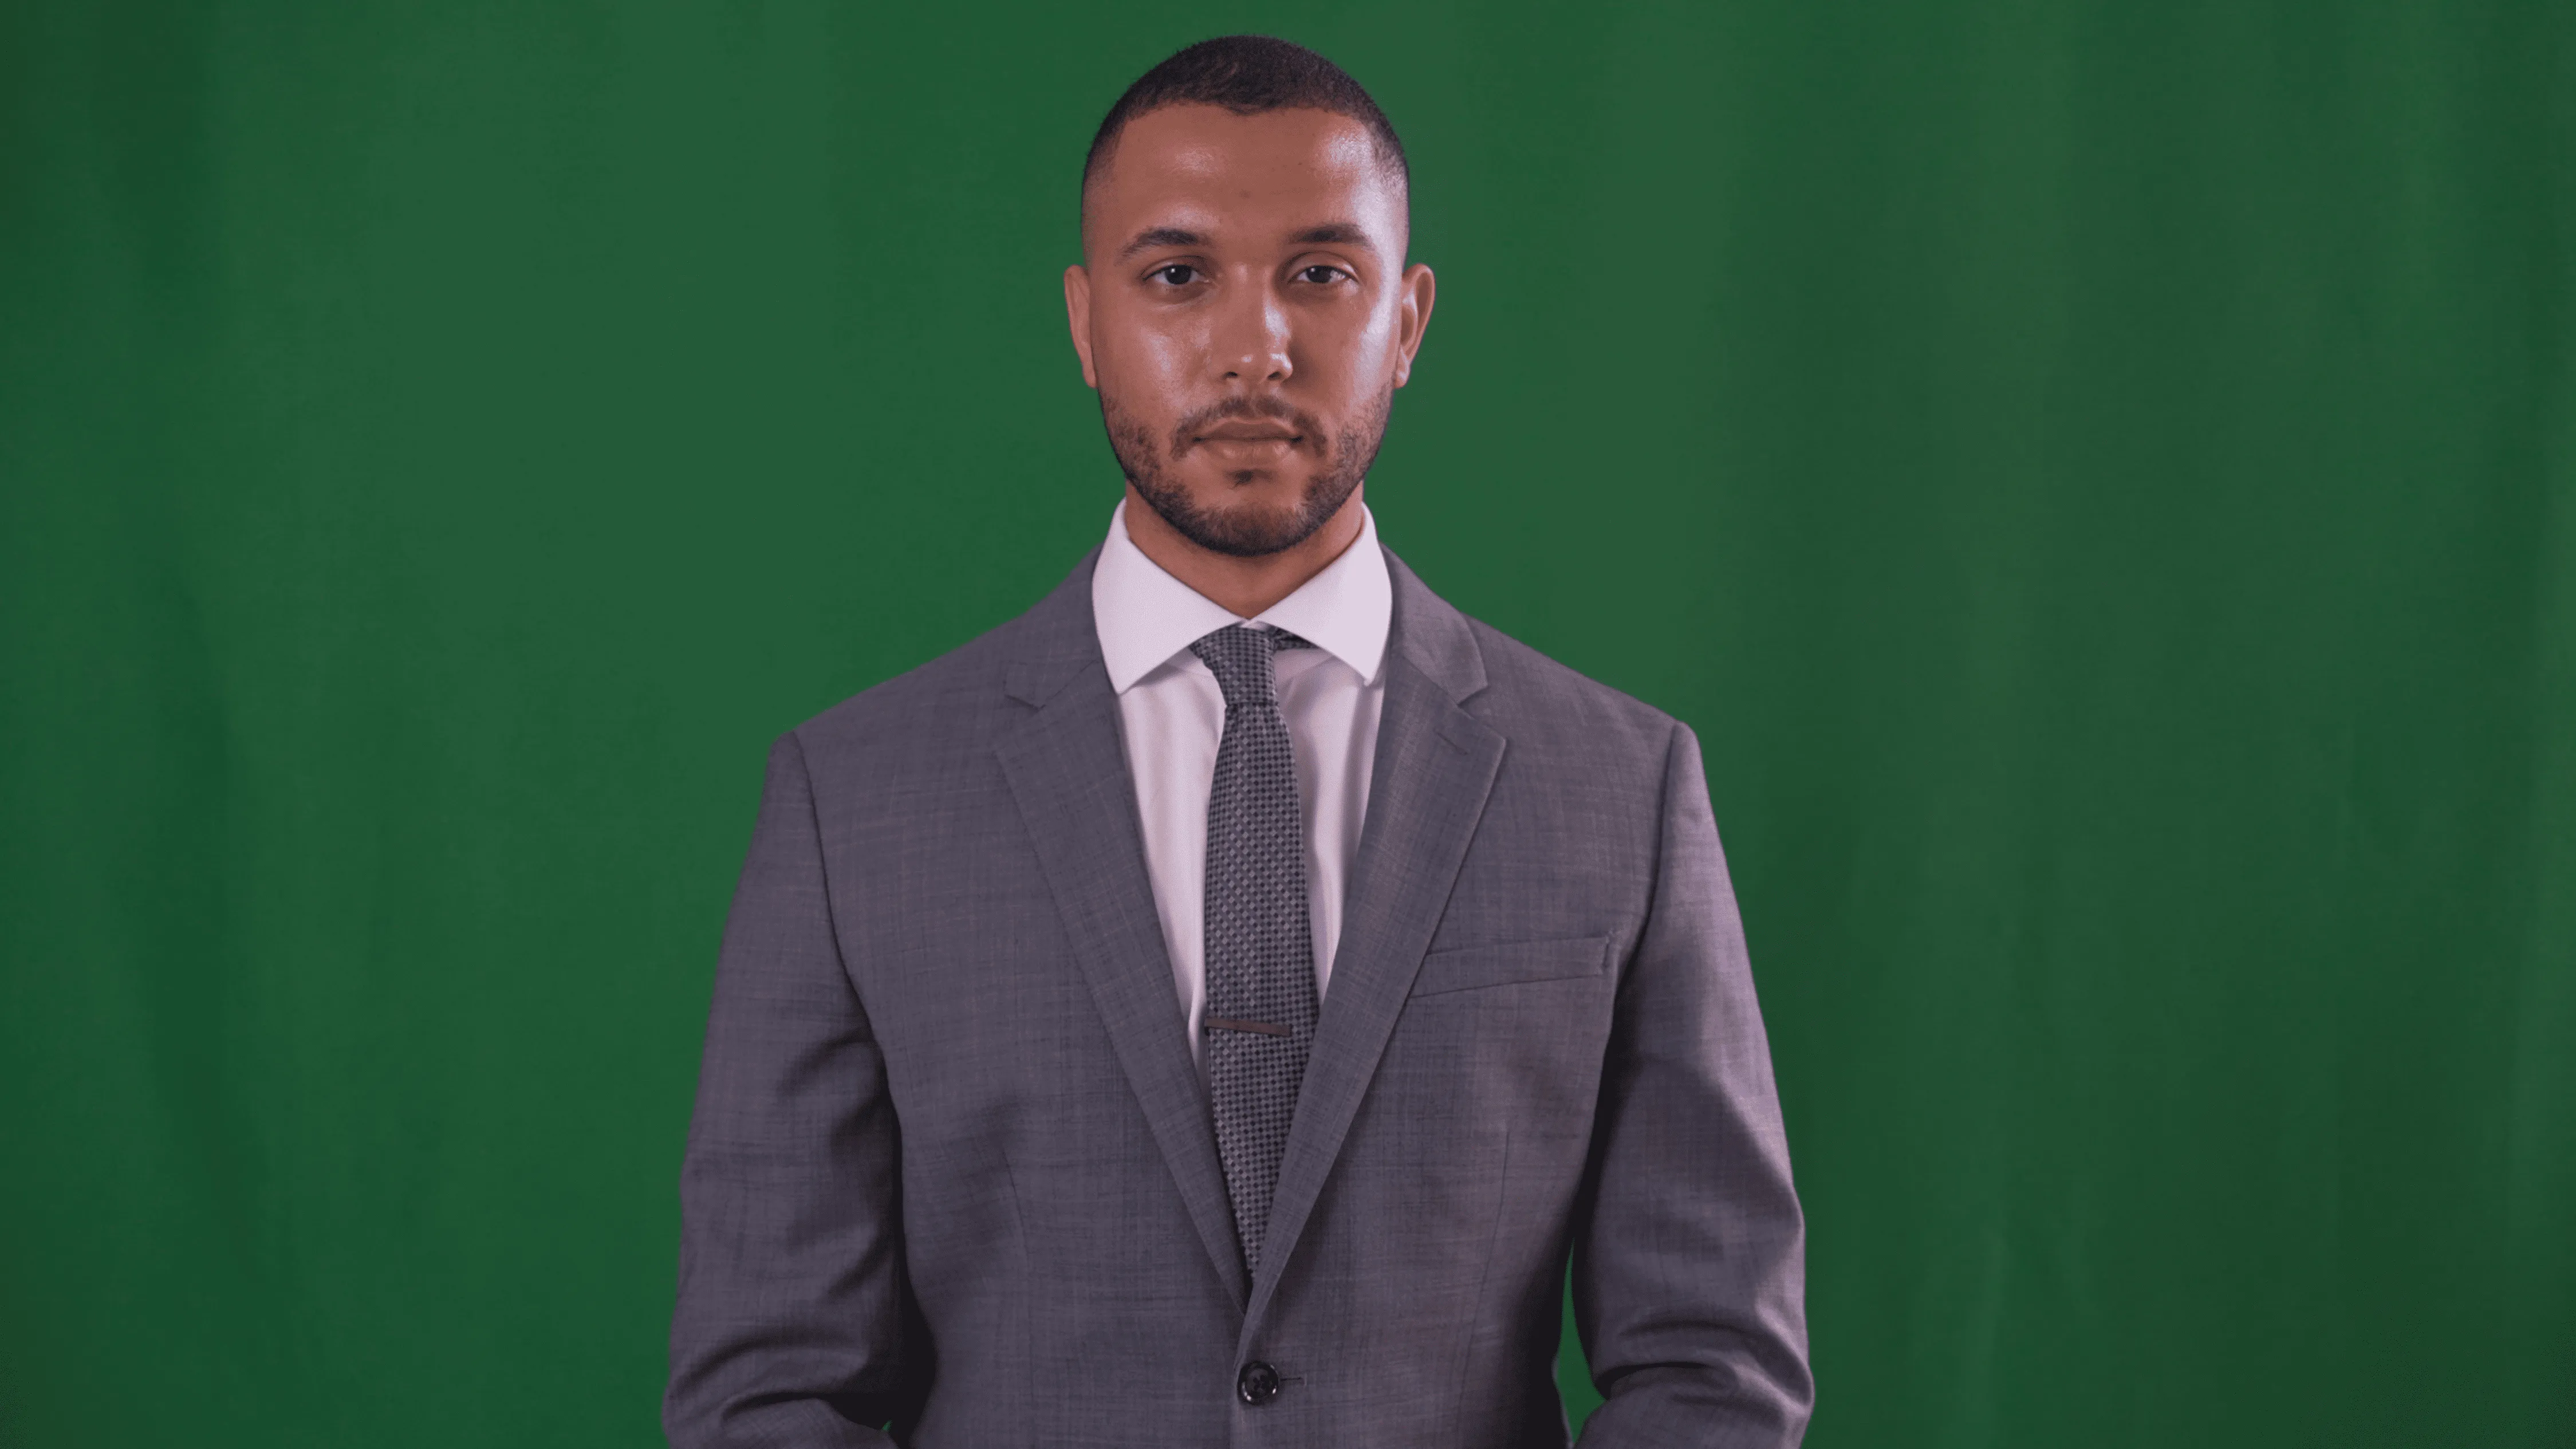
When we create your synthetic avatar, our team must be able to remove you from the footage, so a green screen or solid background is required for filming. Here are a couple of tips for how to achieve the best results in a green screen studio:
- Make sure the screen is well lit with no shadows.
- When using a different background (other than a green screen), make sure there is clear contrast between you and the background. Solid white or black backgrounds tend to conflict with hair, clothing, and eye color, etc. and should be avoided.
- The green screen/background should be flat and without wrinkles.
Camera Settings
A good quality camera is critical. Make sure you shoot with a dedicated video camera or iPhone 12 and above (if using the back camera) and iPhone 13 and above (if using the front camera). Here is what you need to know about the technical setup of the camera:
- Shoot in ultra HD resolution (4K or above).
- You should have the frame rate set at (minimum) 59.94 frames per second.
- It’s still possible to shoot your footage at 30 fps, but it cannot be stressed enough that the overall quality of the final avatar result will be dramatically less. 4K at 60 fps is highly recommended.
- Be sure to have sharp focus on your face and mouth. Most cameras have a focus peak setting which will help you determine the areas of the shot that are in focus. If using an iPhone, the focus and exposure should be locked on the subject’s mouth.
- In most cases, the camera will automatically set the shutter speed. Small apertures may result in slow shutter speeds, so be sure to use a tripod.
The key is to have good lighting, sharp focus, and the correct exposure and white balance settings to avoid dark and/or grainy footage.
Framing The Shot
The way you frame yourself during the shoot is key for the best result. The way you frame yourself during the shoot is key for the best result. We allow two different framing options at the moment:
Shot Option 1: Medium Close-Up
Level the camera to your eye line and frame the shot as a medium close-up shot from just below the chest with sufficient headroom at the top of the framing.
Shot Option 2: Mid-Shot
Level the camera to your eye line and frame the shot as a medium close-up shot from just below the chest with sufficient headroom at the top of the framing.
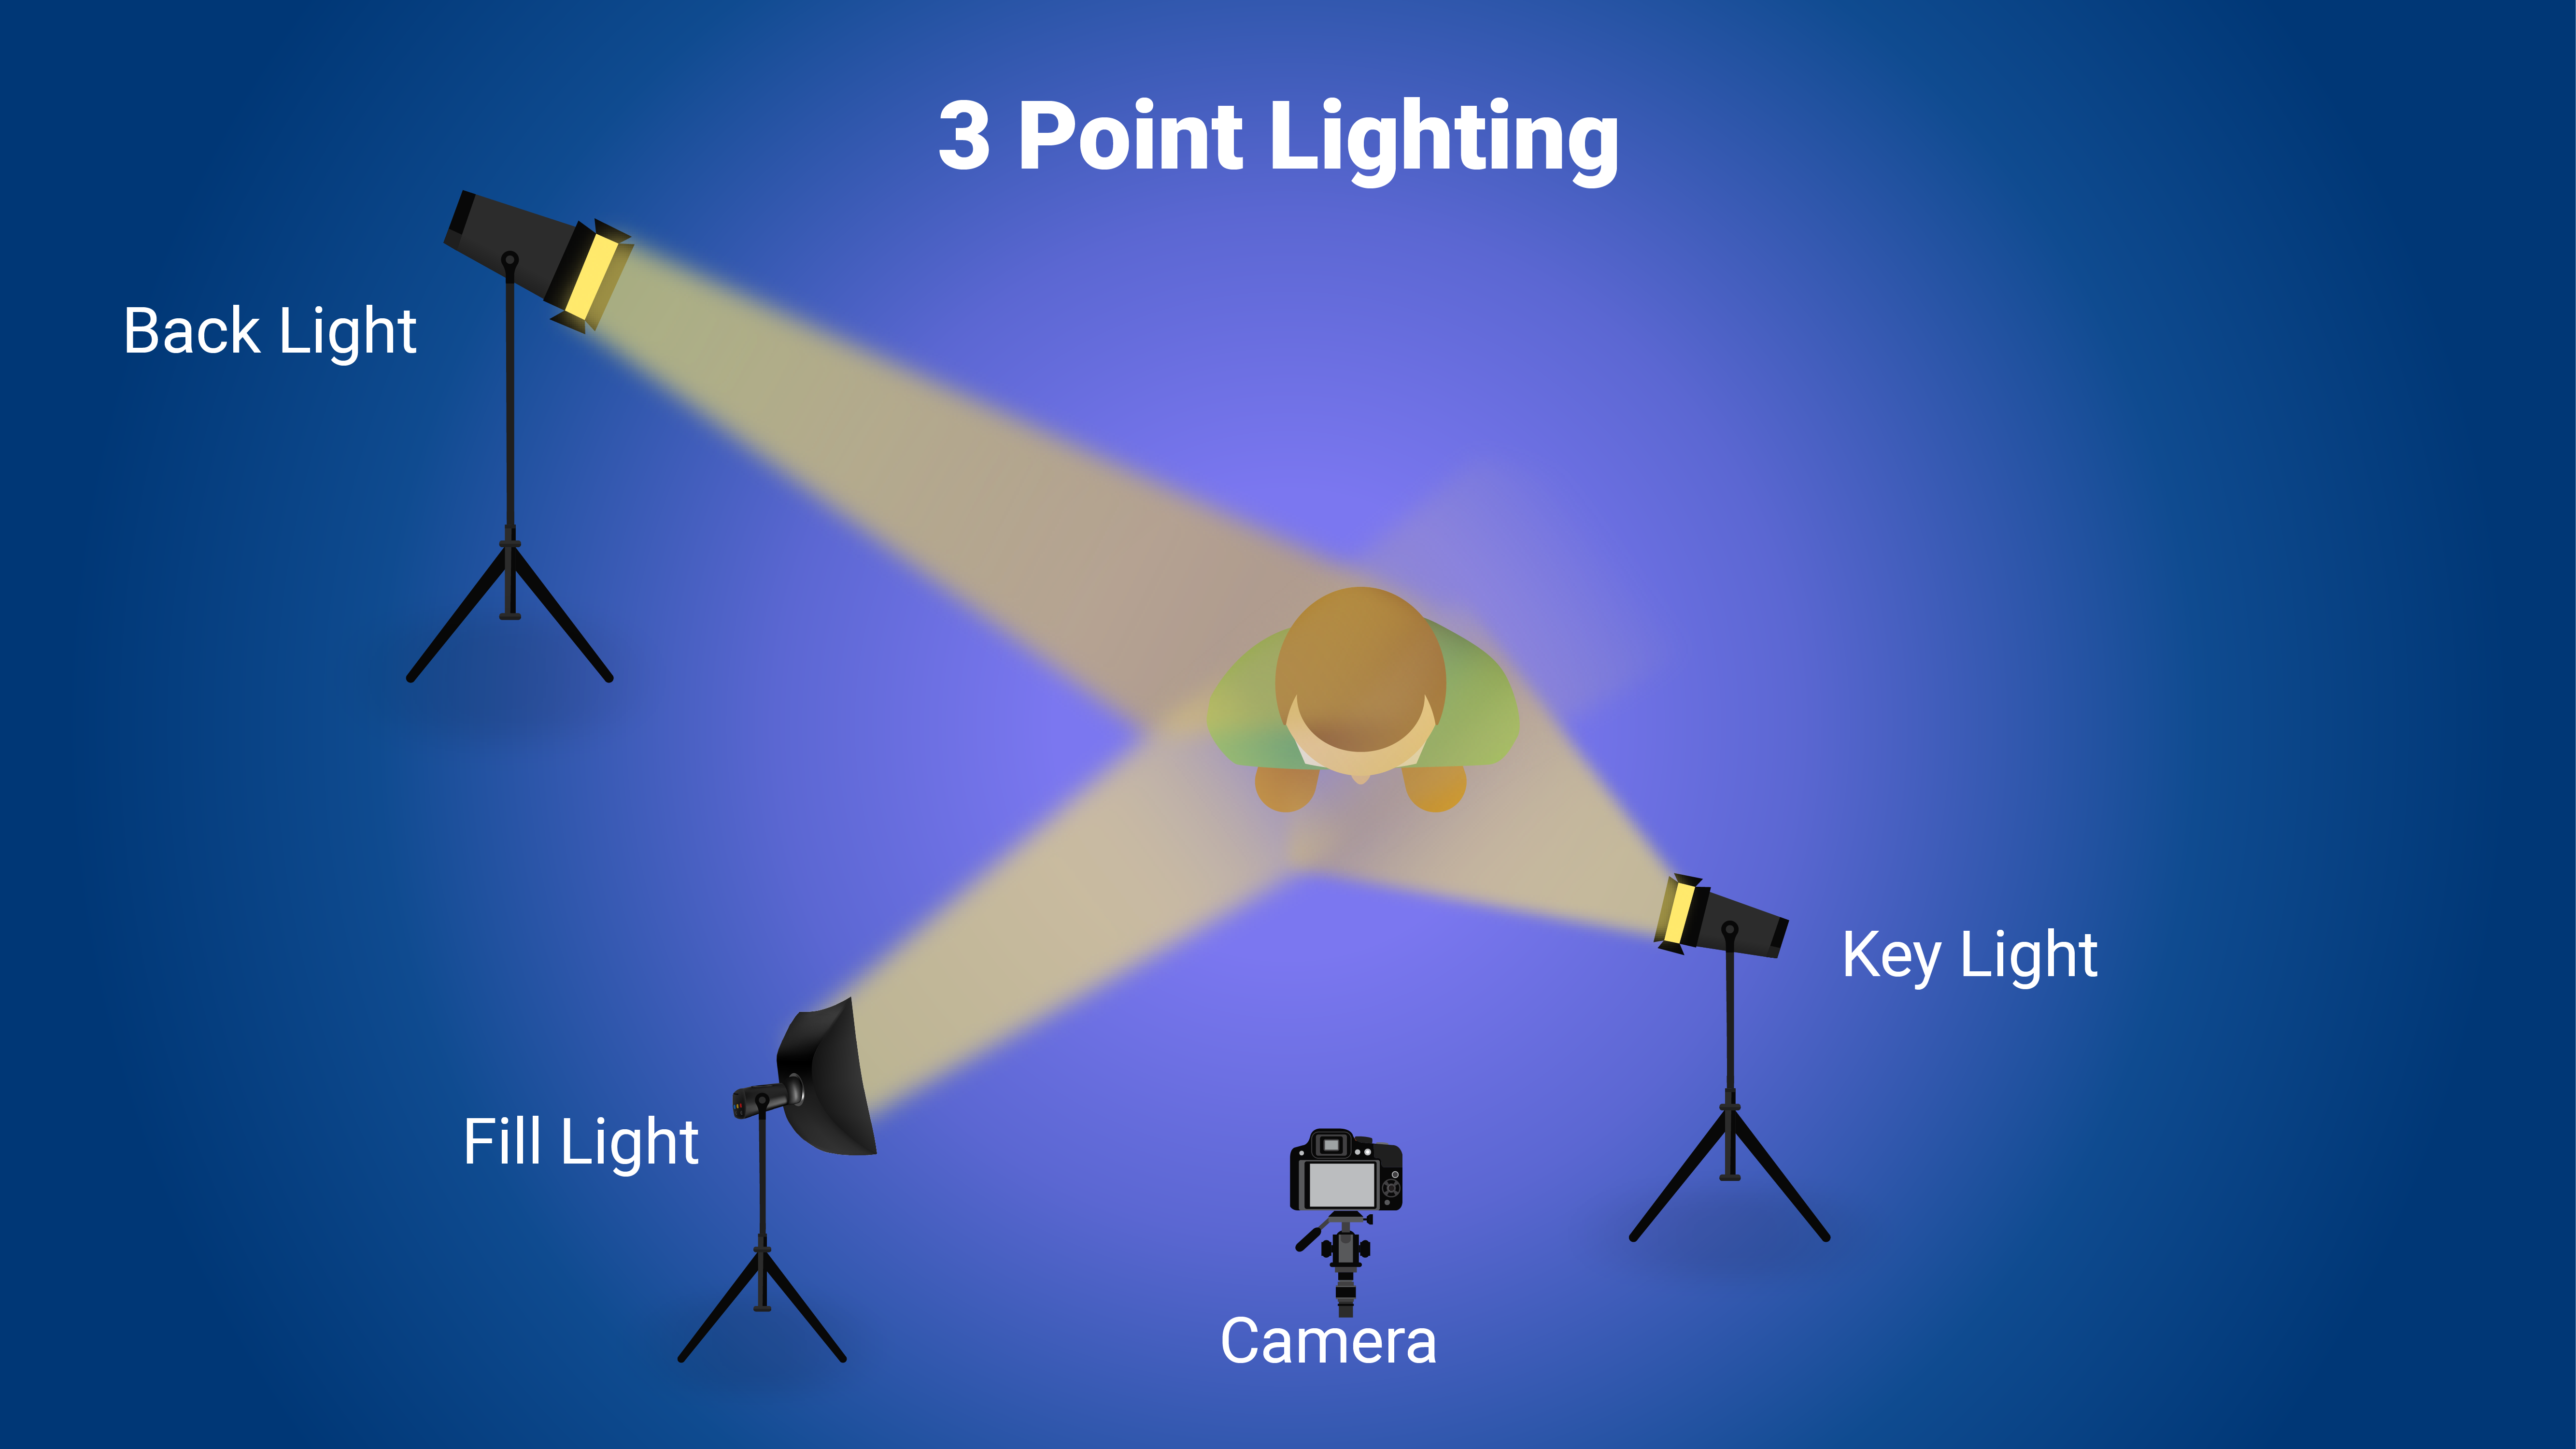
Lighting
Good lighting sets the tone and the feel for the look of the avatar and plays a significant role in the quality of the footage. To achieve the best outcome, a three point lighting setup with fixed, even illumination is recommended. It's very important not to have shadows, particularly across the face.
Use a main key light at the front to illuminate yourself. This is positioned slightly to one side to add depth to the face. Use a fill light on the other side of the camera in order to balance and avoid the shadows when available. The use of a backlight is also recommended as it further highlights and separates you from the background.
Audio
We use audio to train our AI algorithms to match your lip movement. Because of this, it's essential to have clear audio. Please make sure to keep background noise to an absolute minimum. A firetruck passing or office sounds, such as noisy air conditioning, can be problematic for the synthetic output.
Additionally, please make sure only you speak during the performance. For example, the camera person, if applicable, should not feed you lines. For the best outcome, use audio from a lapel microphone. If that is not an option, you can use camera audio. We're looking for 5 clear takes of you speaking into the camera and as little noise as possible for each set of footage.
Wardrobe
You’re free to wear whatever type of wardrobe you prefer (within reason 😅)
Business casual attire may include: khaki or dress pants and a button-down or short-sleeved shirt with a collar; jacket, blouse, or modest dress or skirt.
Casual attire may include: khakis or jeans, short-sleeved shirt with a collar, plain t-shirt, polo shirt, loafers, clean sneakers or sandals; sundress, long or short skirt, khakis or nice jeans, casual button-down blouse, plain t-shirt, polo shirt, flats or sandals.
Here are some additional tips on wardrobe and hair:
- Wardrobe should be clean and wrinkle-free.
- Wardrobe colors should not conflict with the color of the background (ie. a green shirt against a green screen background).
- Please do not use hats, sunglasses, or any other accessories that block out your face.
- Please make sure your hair is tight and that you cannot see the background through it.
- We also ask that there are no hair strands that go across your face.
- Facial hair is permitted but must be neat, clean and trim.
- Earrings and nose piercings are permitted but must be small and may not contain any shiny metal.
- Makeup, if applicable, should aim for a natural look and glossy, shiny lip gloss, foundation, etc. should not be worn.
Performance
The performance is the most important element of creating a synthetic avatar. Make sure you are calm, relaxed, and not rushing.
We use two standard scripts along with a consent script (attached) to help us analyze how you move your face, mouth, and lips while speaking. It is important to deliver each script with a short pause and closed mouth after every sentence.
The two scripts should be recorded as one continuous, sequential shot, without edits. This means that you should recite the script from start to finish as one sequence, without adjustment and then continue on to the next script. Though relatively minor, each cut produces slight body position and framing adjustments within the video, and the technology has a difficult time gaining an accurate representation of the talent’s speaking style as a result. As such, you should remain positioned in the same pose within the frame throughout the shot.
There should be no submitted takes in which you become distracted and stop performing. Even if you become confused, stumble over and/or miss a word, you should keep your composure and simply continue reading from the next convenient point in the script without breaking your performance.
You will get the best result if you’re familiar with the script and then deliver it to the camera with the assistance of a teleprompter, so it’s helpful to take time to review the script before your performance. The use of the teleprompter keeps the performance natural and your eye line direct to the camera. Subtle brow, cheek, and facial movement, in order to emphasize emotion, are acceptable but the performance should remain relatively neutral without looking too robotic. Remember, we are looking for a natural delivery with a positive expression and pauses (with a neutral mouth; lips closed) between sentences.
Teleprompter
Unless you are able to memorize each script, the performance will likely require a teleprompter to help deliver your dialog. Most teleprompter apps will work as long as they don’t impact your camera settings. Just be sure to get comfortable with the scroll speed before you begin so that you don't have to adjust settings mid-recording as that will likely result in a break in your performance. Depending on the app, you should be able to just copy/paste the scripts directly into the application.
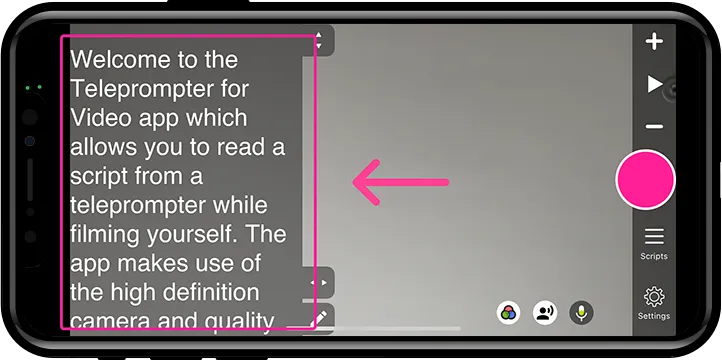
How and where you place the teleprompter will impact your gaze and side-to-side eye movement while looking into the camera. You’ll need to ensure you reduce the amount your eyes shift back and forth as you read so that your avatar has a more natural-looking gaze. This can be accomplished by setting up the teleprompter so that your eyes are looking directly into the camera lens (or close as to it as possible) and the script within the teleprompter app is slightly narrower in order to reduce your side-to-side eye movement.
If using a phone to record your footage, we highly recommend the “Teleprompter for Video” app available via the Apple Store and Google Play. It’s one of the view teleprompter apps that allow you to shoot in 4k at 60fps from the front camera.
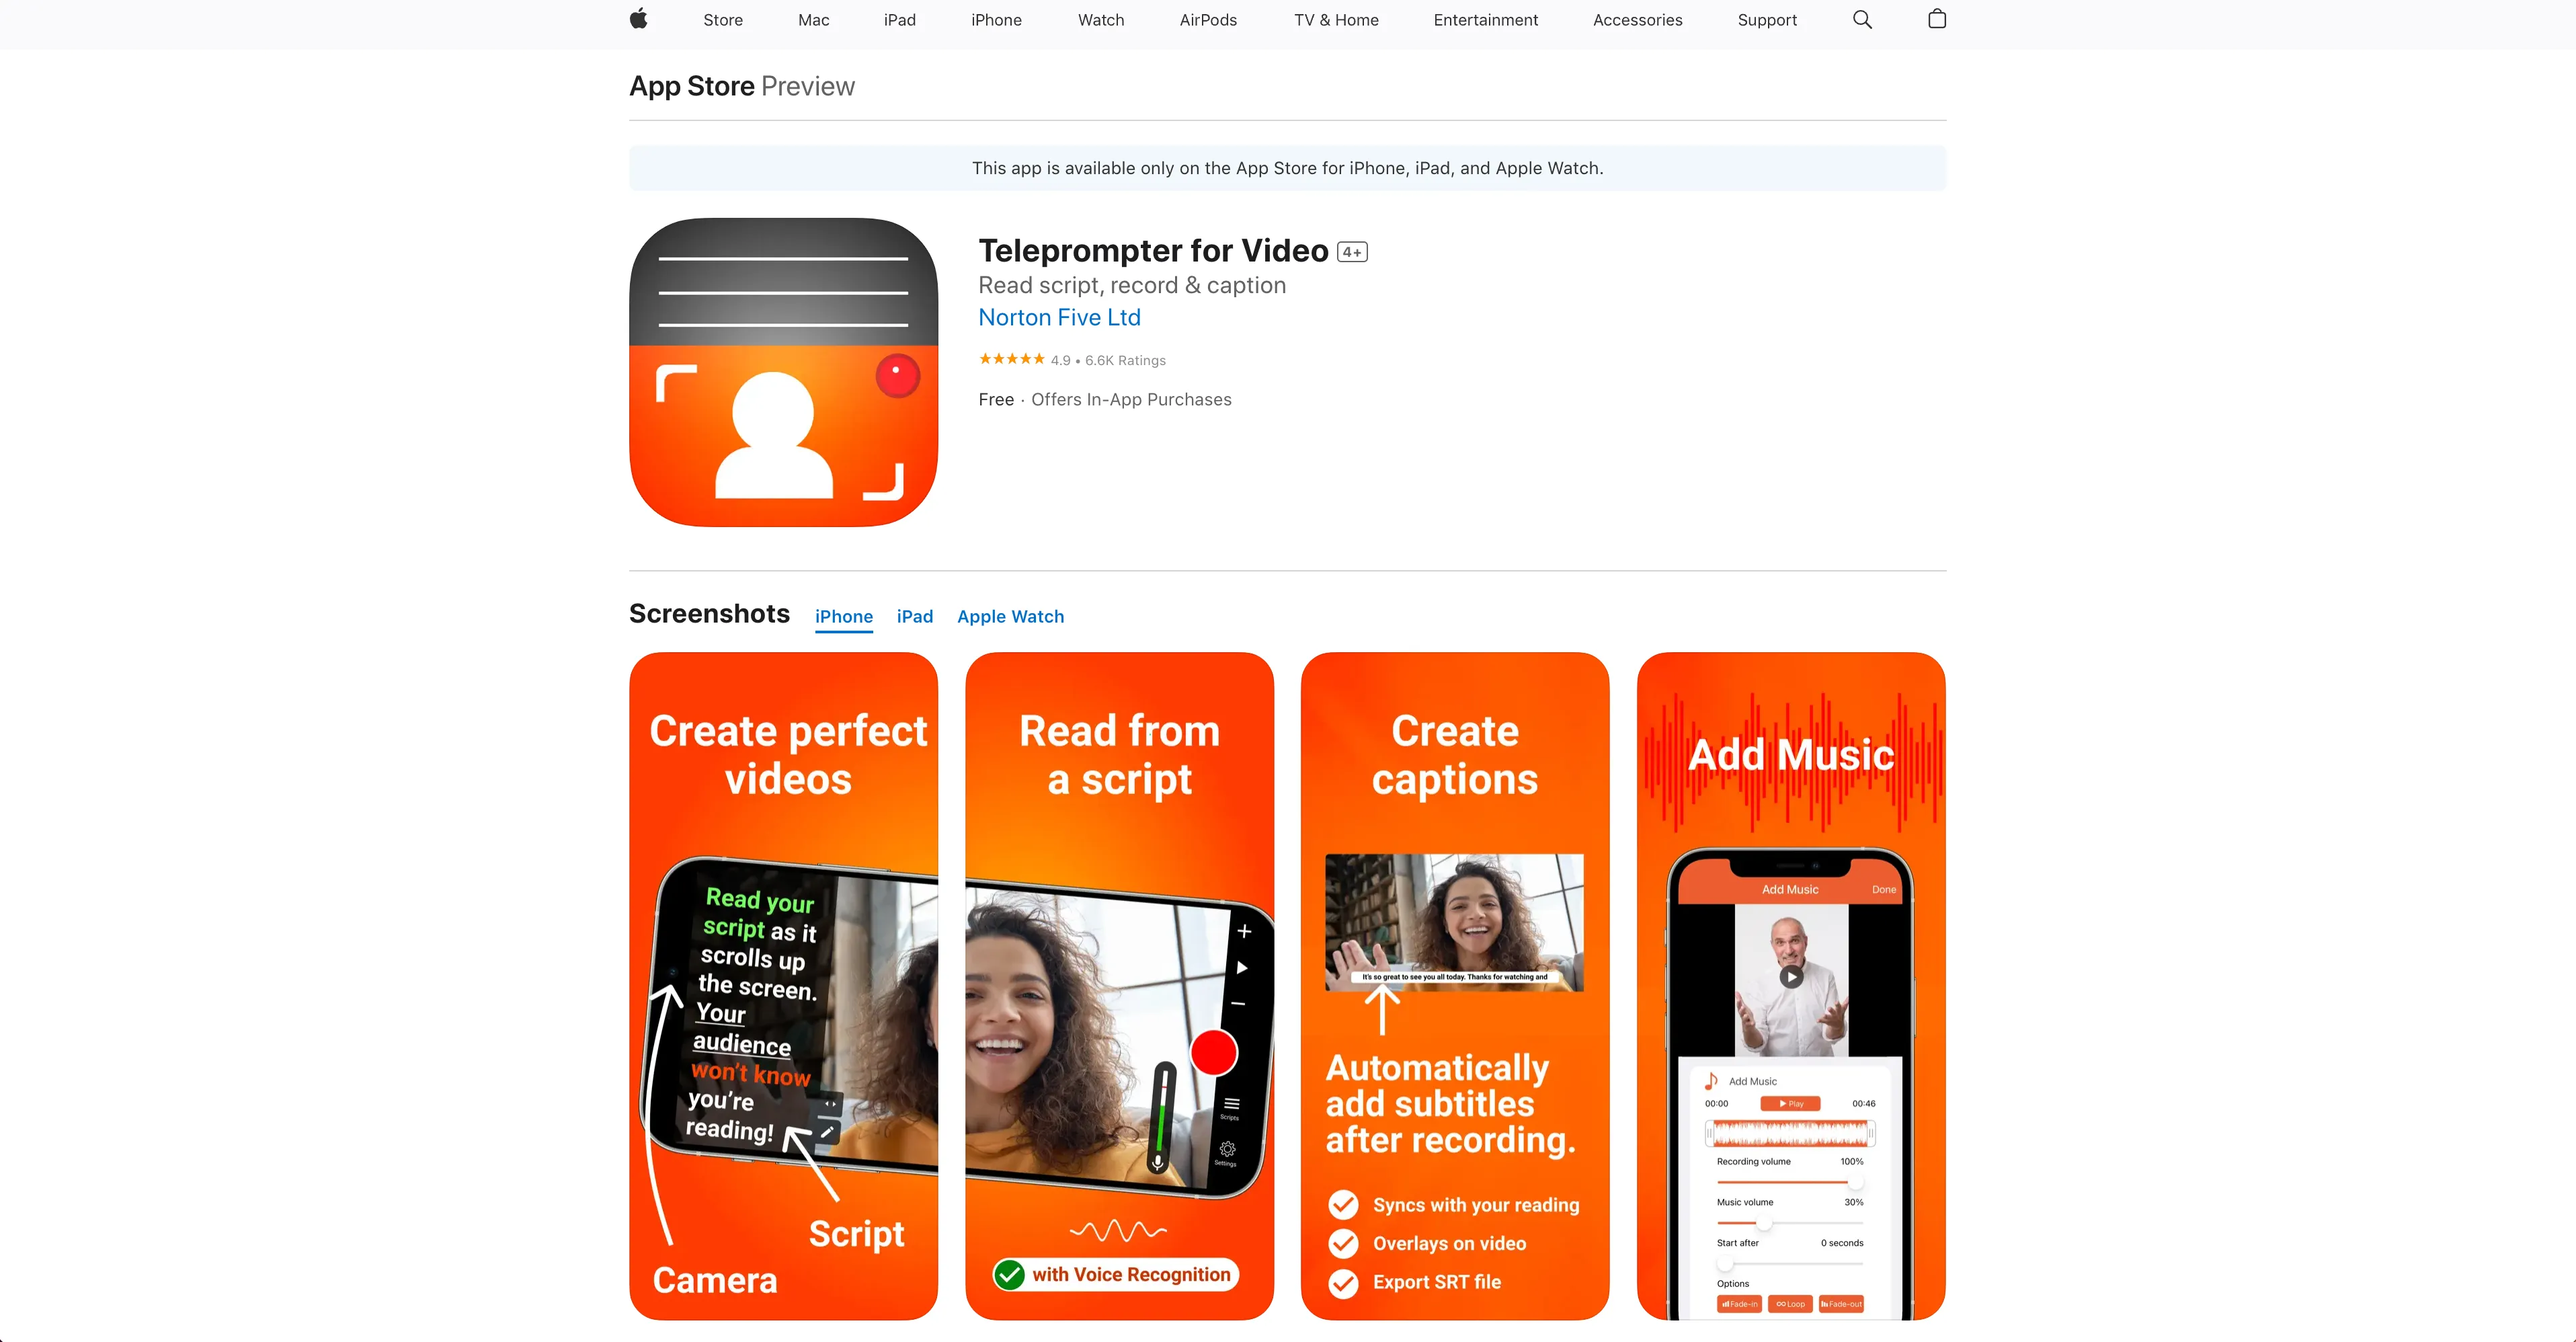
It's crucial for the overall quality of your avatar to ensure you record your footage in 4k at 60 fps. Here’s how you can adjust the settings in the Teleprompter for Video application to make sure you’re using the recommended settings:
1. Tap Settings
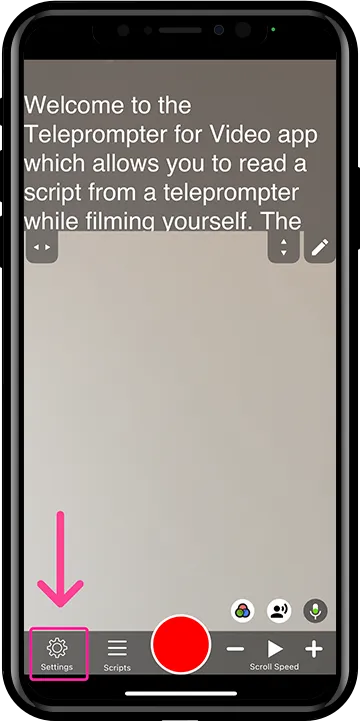
2. Tap the camera icon
3. Tap Quality settings (make sure Camera is set to “Front”)
4. Adjust settings to 4K at 60fps
Positioning The Script
How and where you place the teleprompter will impact your gaze and side-to-side eye movement while looking into the camera. You’ll need to ensure you reduce the amount your eyes shift back and forth as you read so that your avatar has a more natural-looking gaze. This can be accomplished by setting up the teleprompter so that your eyes are looking directly into the camera lens (or close as to it as possible) and the script within the teleprompter app is slightly narrower in order to reduce your side-to-side eye movement.
Submitting Your Footage
Once you’ve finished the filming process, you can upload the final results to any file sharing tool you prefer (Google Drive, Dropbox, etc.). Just be sure to provide access to us at support@pipio.ai and reach out to let our team know when the footage is ready.